


OpenAI TTS GUI: The easiest way to create high-quality voiceovers without coding
Beginner-friendly guide to using OpenAI TTS GUI. Learn how to get your API key, set up voices, speed, and formats, handle long texts, and generate speech without technical setup.

AI generated speech has recently become very popular. It is used by bloggers, teachers, course creators, for audiobooks, and even for fun projects. However, most services remain expensive. One of the most affordable options is OpenAI, but it can only be accessed through the API, which feels too complicated for an average user.
That is why OpenAI TTS GUI was created. It is a simple program that runs directly on your computer. It provides access to different OpenAI voices without any coding or technical setup. Just paste your text, choose a voice, click a button, and within seconds you get a ready-to-use audio file.
In this guide, we will walk you through how to use OpenAI TTS GUI from the first launch to creating your own voiceovers. You will learn how to enter the API key correctly, configure the voice and audio format, work with long texts, and avoid common mistakes. This material is suitable both for beginners and for those who have already tried other tools but are looking for a simpler and more affordable option.
Download the program from this page. It does not require installation: just run the file, and the interface window will open immediately. On the first launch, you may see warnings about the missing API key. You can simply close them.
Next, you need to get an OpenAI API key. If you don’t know how to do this, follow our detailed guide, which you can find here.
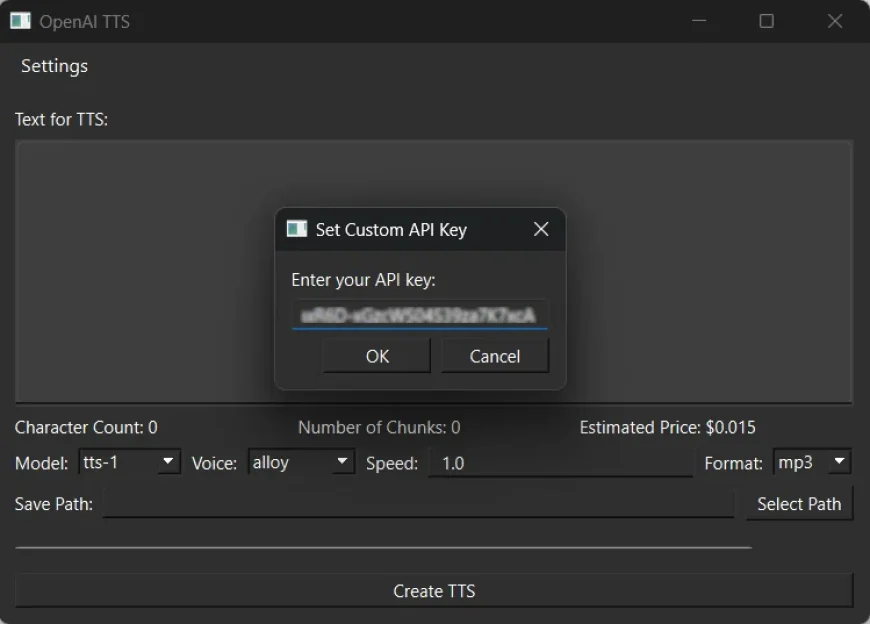
Once you have the key, open OpenAI TTS GUI again. In the top menu, go to Settings → API Key → Set Custom. In the window that appears, paste your key (it starts with sk-...) and click OK.
With the API key added, you can start working directly with OpenAI TTS GUI. In the program window, you will see a large Text for TTS field — paste your text here.
Below the text box, the program shows the number of characters, the number of chunks (parts the text is split into), and an estimated cost. This helps you calculate expenses in advance.
Keep in mind that the program automatically splits long texts into chunks and then merges them back into a single audio file, so you don’t need to do it manually. However, in the settings you can enable the option Retain individual audio files. When this option is active, the program saves each chunk separately, which is useful for editing, detailed review, or assembling your own mix.
- Model — choose one of the models. For tests and short fragments,
tts-1works well, while for final results it is better to usetts-1-hd. - Voice — pick a voice such as
alloy,echo,shimmer, or other available ones. - Speed — set the playback speed. A value of
1.0corresponds to a natural tempo. - Format — select the output format:
mp3,aac,flac,opus. Formats likewavorflacare better for editing, whilemp3oraacare more convenient for quick publishing.
In the Save Path field, specify where to save the finished file. It is important to enter the full path including the file name (for example: C:\Users\Name\Desktop\voice.mp3).
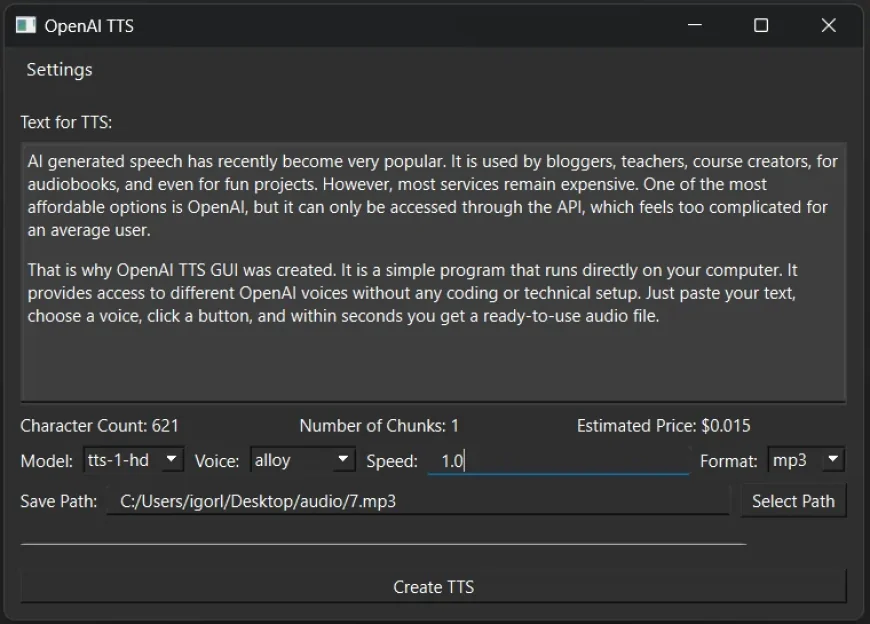
Once everything is set, click Create TTS. The program will send your text to OpenAI’s servers, generate the speech, and save it to the specified location.
Note
The API key is stored either in the system keyring or in the program’s file. If you are working on someone else’s computer, make sure to delete the key afterward so that no one else can use it.
If something is unclear or the program’s interface has changed over time, please leave a comment. We will do our best to answer your questions and update the guide to keep it accurate.
What's Your Reaction?
 Like
0
Like
0
 Dislike
0
Dislike
0
 Love
0
Love
0
 Funny
0
Funny
0
 Angry
0
Angry
0
 Sad
0
Sad
0
 Wow
0
Wow
0